Friday, September 30, 2011
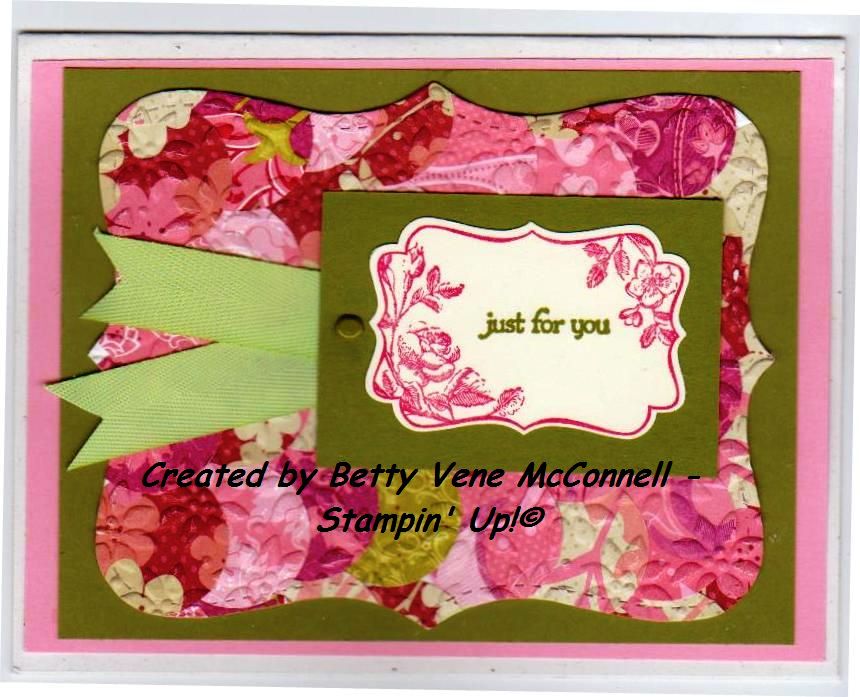
THANKSGIVING FABULOUS FLORETS
Three Thanksgiving cards with a new set that is sure to become a favorite.
Monday, September 26, 2011
COMPOSITION NOTEBOOKS or JOURNALS
Another excellent way to use retired Designer Paper is to cover Composition Books to be used as special notebooks or journals. Here are three that use a combination of retired and current products. I know that you can adapt any of them to the use of current products and hope these may give you an idea or two. For the back and the insides of the covers, I use either Designer Paper or plain card stock, depending on what I have and want to use. These three all have DP of different designs from the front cover but from the same package so that they coordinate well. That's what I like so much about Stampin' Up! Coordinating colors and designs are so easy and look great.
Labels:
Covered notebooks,
Crosses of Hope,
Journals,
Punches
Saturday, September 24, 2011
COLLAGED CIRCLES
Collaged Circles is a fun technique from the Technique Junkes' newsletter. http://www.techniquejunkies.com/
It's another attractive way to use scraps of Designer Paper. Maybe even toss in some circles punched from solid color card stock. These samples are made from a retired DP and some retired ribbon. Colors of cardstock are Rose Red, Pretty in Pink, and Old Olive. The lighter green is also a retired color which was one of my favorites so I purchased extra when I knew it was going to retire - Sage Shadow.Monday, September 19, 2011
DECORAH EAGLE PROJECT
All last winter, spring and early summer, I was mesmerized at the computer watching the hatching, growth and development of a family of 3 eaglets. It was such an amazing experience to be able to observe the wonderful parenting of both the male and female as well as to watch the growth of the eaglets from little balls of fluff to juveniles now out on their own. I can hardly wait to see how the parents restore the nest in preparation for their next family. This is one of two cards - unfortunately the one that I scanned is the one that is a bit crooked. One went to the friend who introduced me to the website and the other to the owner of the web cam and the eagle project. If you had been watching the nest, you would recognize the red twine that caused so much concern, the corn husks, fish, fluff, sticks... A fun project. The camera is still on the empty nest. The parents are beginining to come back to the nest for very short visits in the early morning and I've seen the male move a few sticks around. They will be preparing the nest for the next clutch and that will be fascinating to watch. http://www.ustream.tv/decoraheagles
Saturday, September 17, 2011
CARD MINISTRY WORKSHOP
We had such a great time yesterday making cards to be sent out from the church by Anne. Unfortunately, I didn't take a picture of Anne's before she left with hers, but she created some lovely cards using her dried flowers. I didn't get a count of Anne's before she left so don't have an accurate number but it is close to, or maybe more than, 50 cards that we produced in the afternoon and evening sessions. It was such fun to see the new stampers and card makers find that they created lovely cards. Whoever receives them will be thrilled and impressed. The experienced stampers tackled the more intricate cards as well as helped the newbies. Of course, we enjoyed an evening of laughter and chatter - always an important ingredient of card making time together. Butterflies and birds seemed to be the theme of the evening. Next time it will be something different. 

Donna's Sherry's
Betsy's
Helen's Sandy's
Betsy and Sandy


Donna's Sherry's
Betsy's
Helen's Sandy's
Betsy and Sandy
Beth's
Labels:
Big Shot,
Butterfllies,
Card Ministry,
Crosses of Hope,
Designer Paper,
Punches
Wednesday, September 14, 2011
JUST PUNCHES
You don't even have to be a stamper to create a lovely card. Here is a card created from Designer Paper and punches. I'm lovin' the Dotted Scallop Border punch. You'll be seeing much using that punch in the future. The medallion is made with the new triple layer punch which also is a fun punch. Of course, you recognize the scallop border punch. The small flower with the brad in the center is a retired punch but any of our newer small punches will work just as nicely. The grosgrain ribbon is just tied in a knot and attached with glue dots. If you wished, you could still add a sentiment on the front of the card or leave it as is. It looks very nice without a sentiment on the front. Once again, using my stash of retired papers and card stock but you can see how this will work with the current DP and card stock of your choice.
SAIL AWAY GRADUATION CARD
Here is the card that I made for my grandson's graduation. Not too hokey - "Sail Away to the future"? Oh well. I liked the idea. I sponged the Whisper White after coloring the sails with a Signo white gel pen. It really is the best white gel pen on the market that I've found. The baker's twine is a new product and, even though the rest of the products on this card were in the Summer Mini and not now available, the twine made it into the current Idea Book and Catalog and is proving to be popular. It also comes in brown and white and in plain white.
Monday, September 12, 2011
BOOKMARK CALENDARS
Bookmark calendars are also a fun project. Here are two, one showing the front and one the back. You decide which is which. The stamp sets were in the 2011 Summer Mini catalog. I'd be delighted if they were to come back next year in the big catalog. Actually, Open Sea stamp set is a write in for the current catalog but Sail Away is not currently available. Here is my inspiration for the bookmarks and the template for next year. Cat so generously shares. Thanks, Cat. http://www.catscreativeplace.com/
Stamp Sets: Sail Away, Open Sea
Saturday, September 10, 2011
HAVE YOU SEEN THE NEW CATALOGS?
If you haven't yet seen the current Idea Book and Catalog that came out July 1st, or the Holiday Mini that will be available from now until January 3rd, just click on the images on the left side of this blog to see them online. Did you know that you can order directly and save a little? If you do, you will have an opportunity at the website to name me as your Demonstrator.
There are some new things in the Holiday Mini that are exciting. The Simply Scoring Tool is getting lots of great accolades already.
How about 1"x 8" cellophane bags for Halloween treats?
A Holiday Stocking BigZ die for your Big Shot and a Stocking Builder Punch, Glimmer Paper, Quilted Satin Ribbon, Mini Jingle Bells and so much more. Of course, there are new stamp sets, Designer Paper, Fabric and other accessories, new Digital Downloads.... You just have to take a look!
There are some new things in the Holiday Mini that are exciting. The Simply Scoring Tool is getting lots of great accolades already.
How about 1"x 8" cellophane bags for Halloween treats?
A Holiday Stocking BigZ die for your Big Shot and a Stocking Builder Punch, Glimmer Paper, Quilted Satin Ribbon, Mini Jingle Bells and so much more. Of course, there are new stamp sets, Designer Paper, Fabric and other accessories, new Digital Downloads.... You just have to take a look!
AUTUMN DAYS THINKING OF YOU
Autumn Days is a wonderful stamp set as you can see from previous posts. It easily spans the Autumn and the Christmas seasons. For this one, I colored the pheasant stamp with markers and stamped it on Whisper White, then cut it out and adhered it to the card using Stampin' Dimensionals to pop it up.
The stamp set includes a pine cone "bouquet" as well as the autumn themed stamps so it is especially useful for the winter holidays. You can purchase it either with wood mounts or clear mount. It is a Must Have in my stamp inventory for this time of the year.
The sentiment is from the Sincere Salutations set - another Go-To set that I use all the time.
The ribbon used here is retired, but there are so many excellent choices in the new catalog, you will find just the right one to enhance your card.
The stamp set includes a pine cone "bouquet" as well as the autumn themed stamps so it is especially useful for the winter holidays. You can purchase it either with wood mounts or clear mount. It is a Must Have in my stamp inventory for this time of the year.
The sentiment is from the Sincere Salutations set - another Go-To set that I use all the time.
The ribbon used here is retired, but there are so many excellent choices in the new catalog, you will find just the right one to enhance your card.
Dreams du Jour Easel Calendars
These calendar easel cards were made in January before I broke my arm - fortunatly. Easel cards are fun to make, they mail in the standard card envelope and, as a calendar, make a year long reminder of your friendship with the person who is lucky enough to receive the card from you. Dreams du Jour is a delightful set and, if you know me, butterflies and ribbon are my favorite embellishments. The stamp set is in the current catalog, the designer papers shown here are retired bits from my stash that I'm trying to reduce.
REPORTING IN - AGAIN!
Oh Goodness. You can see that May came and went and no contributions here from me. Healing and a return to some sense of normality has taken much longer than I anticipated. So, here's another try. I have been doing some stamping and card making in the past month - mostly using retired products. I'm trying to be responsible and reduce my stash before buying much new. Not an easy challenge! So, for the time being, I'll be posting some projects that I've enjoyed making from retired products and hope they may give you some ideas for design or technique - or that you just enjoy looking at them. Of course, I'd love to have your comments on any of them.
Sunday, March 20, 2011
REPORTING IN
Hi Stampers,
Some of you have sent emails asking why I haven't posted for such a long time. Here's a quick update:
At Christmas time this year I was using products from my stash rather than current Stampin'Up! products, so didn't post.
Then, I went on vacation and while on vacation, fell and broke my right arm. It has been immobilized since that time and will be for another six weeks. That has meant no stamping, or even writing, or typing with my right hand.
It is healing, though, so I expect to be back at the stamp table in early May. Wow! Do I have a lot of projects in mind that I want to do.
Thanks for your well wishes and check back here in a couple of months.
Happy Stampin'!
Betty Vene
Some of you have sent emails asking why I haven't posted for such a long time. Here's a quick update:
At Christmas time this year I was using products from my stash rather than current Stampin'Up! products, so didn't post.
Then, I went on vacation and while on vacation, fell and broke my right arm. It has been immobilized since that time and will be for another six weeks. That has meant no stamping, or even writing, or typing with my right hand.
It is healing, though, so I expect to be back at the stamp table in early May. Wow! Do I have a lot of projects in mind that I want to do.
Thanks for your well wishes and check back here in a couple of months.
Happy Stampin'!
Betty Vene
Tuesday, November 16, 2010
AUTUMN DAYS WREATHS
Now you see another another delightful way to use the foliage in the Autumn Days stamp set. Stamping the wreath is quick and easy. Just punch a 1 3/8" circle for a mask to create the center of the wreath, adhere it to the center of Whisper White card stock with Dotto or another temporary adhesive and stamp your images. Remove the mask and there is room for a sentiment using Teeny Timy Wishes. I've used this card this Autumn for Get Well, for Birthday, for a Thank You, and, of course, it is perfect for a Thanksgiving card.
Monday, November 15, 2010
AUTUMN DAYS VASES
Autumn Days is a great stamp set. It is so versatile that it will carry you through Autumn and Christmas with ease. I'll be posting a number of cards using it.
This set of cards uses oval and circle punches for the vase and, except for sentiments, all the stamps are in the Autumn Days stamp set.
Card stock and ink: Whisper White, Naturals White, Old Olive, Cajun Craze, More Mustard, Tangerine Tango, So Saffron, Certainly Celery, Versamark
Punches: 1 3/8 " circle, large oval, Word Window, Phto Corner
In case your are wondering about the multicolored circle in the bottom card - that was an afterthought. Tomorrow, I will show you Autumn wreath cards made with this set. The circle was the mask for the center of the wreath and when I finished using it, it was just too interesting to toss out. But, then, I don't toss out very much!
Friday, November 12, 2010
CHRISTMAS GIFT TAGS
Here are two of the packages of Christmas gift tags that were sold at a Holiday Auction silent auction. Again, I've used retired products as well as current ones. The bells on the heading of the one on the left are from the wonderful stamp set Bells and Boughs in the current Holiday Mini Catalog. I used markers to color the stamp and then cut out the images to adhere to the heading. The bags are Stampin' Up! medium cello bags. The perfect size. Each tag in that bag is different, some embossed, some beaded, some booklet form, some simple tags. All of the tags in the bag on the right are punched from retired Designer Paper wtih the Ornament punch and the scallop circle punch. If you don't have those punches, you should. They are so versatile, not just for punching Christmas tags.
Packaging the tags this way, the buyer will have a nice gift for a hostess or office Santa, or ....
I can't believe that it is nearing mid-November and this is the first Christmas stamping I've done this year. I'm still working on autumn and Thanksgiving. I'll show you a few more of these and then get busy on Christmas. Hmmmm - wonder if I'll get my own cards made this year?
Thursday, November 11, 2010
EXTREME SKATEBOARDER
Doesn't he look like he is having a great time? No question that that my 11 year old grandson does. In fact, his father built a half pipe in the driveway for him. It's fun to watch him, especially when I wouldn't even be able to stand on a skateboard, much less perform on one.
The skateboarder here is stamped with the now retired Brilliant Blue ink; Night of Navy would work well. Except for the Whisper White, all the cardstock is of retired colors, but there are plenty of wonderful new colors to create a stunning card for your favorite skateboarder. I used brads for the embellishment, thinking that an 11 year old boy who had a Fear Factor birthday party probably wouldn't appreciate ribbon!.
Wednesday, November 10, 2010
PUNCHED PUMPKINS
Wow! Has it really been so long since the last post? I'll try to make up for it for I have been busy with many projects. Halloween and one Holiday Auction down and another Bazaar coming up. Many of my projects for those events are created from retired materials, so I've been hesitant to post them, but just may change my mind yet. Other projects are outright CASEing of some stampers who are so very talented. In some, I can credit the original creator and in others, I would if I had taken the necessary step to record the originator. Ah well. Let's get started .
Thanksgiving is fast approaching. Have you made your cards yet? Punched pumpkins are so easy to do. Just punch out 3 or 5 cirecles or ovals, sponge the edges and assemble, keeping one full image for the top. Here, I've used the branch from the 2 Step Bird Punch for the vine. I curled the stem around a pencil to give it some dimension. You can see that the one on the left got crushed in the scanner, which is probably what will happen in the mail. So, to mail it, it would be a good idea to glue it down. I love the dimension, though.
Friday, July 23, 2010
POPPIN' PASTELS
I've been playing around with my Stampin' Pastels this week and re-visited one of the old favorites - Poppin' Pastels. Vintage Vogue stamp set lends itself well to the technique. Here, I've used a combination of current and retired colors. Certainly Celery, Rose Red, Pretty in Pink are current. I have three packages of Sage Shadow, now retired, so I used it on the 6x6 technique page. You may see more of it in the future - I do like that color and was sorry to see it go. The text for the technique page is copied from Margo Kelly's Technique Book.
Sorry the one bow got crushed in the scanner. I tried several times to lay it flat, and it just likes to pop up - and then gets crushed. You get the idea. It's pretty in real life.
Here's a tip -that I learned the hard way - as we learn many of ou tips - and you can see the problem on the technique page.
Tip: When combining the die cut oval and the scallop frame from the Big Z Scallop Oval Frame die:
The oval does fit perfectly inside the frame, but ..... glue down the oval first, if it needs to be straight, as this one should be. Then, place the frame so that it is straight. You see that I didn't do it that way on this page and the frame is slightly skewed in order to fit the oval. Perhaps I'll do another one correctly for display. And then again, I probably won't. It'll just be a good teaching tool, don't you think?
Stay tuned. I'm going to play with the Stampin' Pastels some more in the next few days.
Labels:
Big Shot,
Poppin Pastels,
Technique Page,
Vintage Vogue
Thursday, July 8, 2010
CARDS FOR THE TROOPS DAY
WOW! If you weren't here for a terrific day of creating cards for the troops and writing heartfelt messages - you missed out on all the fun!
Our goal was to prepare 300 cards, most to be given to incoming troops who will be coming home through Joint Base Lewis-McChord. The majority of cards were created today, but some were cards which were completed using card fronts generously donated by many stampers and Stampin' Up! Demonstrators. Some of those will be more appropriate to send to the troops who are still deployed for them to use. I truly thought that 300 was stretching it - but we completed just under 450 cards!!!! 325 of those had handwritten messages written in them, another 100 were taken for members of the Puyallup Valley Lions Club members to inscribe, leaving just a few to still be written in, or sent with the group to those who are still deployed.
The youth of St. Peter's United Methodist Church were, once again, nothing short of phenomenal. They met the evening before to prepare snacks for everyone and then spent the entire day working on cards. They and their leaders, Jennifer and Scott. What a bunch! 325 cards ready to be
Their enthusiasm and their dedication is contagious and inspiring. delivered
Thank you- to each one of you.
L. Cindy and Sue - from Puyallup and Lynwood. They were here all day long - and then had the long drive home. Talk about dedication!
R. Marilyn, Dorothy, Jane, Karen from Puyallup Valley Lions club. Another long drive.
At one time, we had so many people working that we ran out of chairs. That didn't stop anyone from continuing. Some just stood up and wrote cards or took care of some go-fer tasks.
Here are some samples of our cards. Enjoy the creativity of both the teens and the adults. What a delight.
I still haven't figured out how to locate pictures on the page or how to get the titles just where I want them. I'm always surprised when it works right, And, now the last photos aren't going where I want them nor are the captions, so here are the people in the photos starting top left and going clockwise:
Jane and Terry
Pastor Tom
Rebecca and Sydney
Julie
Marissa and her Dad and Adora
The two photos at the top of the page - I also couldn't get titled. On the left are Erica and Kaity and on the right is Blue, with Karen in the background
Subscribe to:
Posts (Atom)